


How to Automate Animation and Slideshow Transitions in PowerPoint
How to Automate Animation and Slideshow Transitions in PowerPoint
You can set your existing PowerPoint animations to play automatically so that you don't have to click the slide area to make the next item appear. You can also set the slide transitions to progress automatically, so there is no need to click to proceed to the next slide in your show. These instructions are for PowerPoint 2016, 2013, and 2010. The tabs and section headings may vary slightly in appearance, but the terminology in these instructions will remain the same between each version of PowerPoint.
Note:
This help page assumes that you are working with a PowerPoint file that already includes animations.
This help page assumes that you are working with a PowerPoint file that already includes animations.
Automate Slide Animations
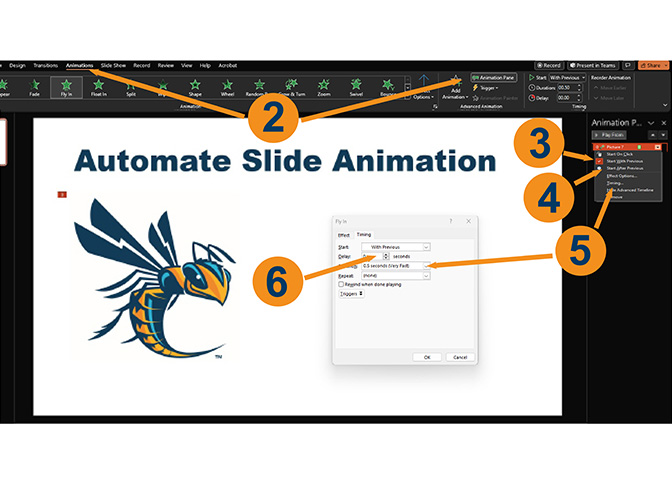
- Open your PowerPoint slideshow.
- Click the [Animations] tab > From the "Advanced Animation" group, click "Animation Pane".
- Right-click the first animation > Select "Start With Previous". This will cause your first animation to start as soon as the slide appears on the screen.
- For each of the remaining animations in your list, right-click and then select "Start After Previous." This will cause all other animations on the slide to occur automatically in the order you have listed them.
- To adjust the time each animations occurs, click the up and down arrows in the "Duration:" field located within the "Timing" group.
- To adjust the time before the next animation appears, click the up and down arrows in the "Delay:" field located within the "Timing" group.
Note:
When you return to a slide after having viewed only part of it, the animation sequences automatically start from the beginning.
When you return to a slide after having viewed only part of it, the animation sequences automatically start from the beginning.
Automate Slide Transitions
![]()
Note:
These instructions can be used to set up a Pecha Kucha Presentation.
These instructions can be used to set up a Pecha Kucha Presentation.
- Click the [Transitions] tab > From the "Transition to This Slide" group, choose the transition you would like to apply to the selected slide.
- To modify the transition speed, adjust the "Duration" drop-down list in the "Timing" group.
- From the "Timing" group, uncheck "On Mouse Click."
- From the "Timing" group, check "After" and modify the drop-down list to display the number of seconds you would like between slides.
- To apply slide transition preferences to all slides, from the "Timing" group, select "Apply to All" or go to each slide and repeat the above steps for each individual slide.
- Save (Ctrl + S) your presentation and run the slideshow (F5) to view your changes.
Keywords: office 2010, office 2013, office 2016, power point, self-run, self run, automated, pecha kucha