


How to Create Contact Group From an Excel File
How to Create Contact Group From an Excel File
Google Mail allows you to import a contact group from an Excel file into Google Contacts. This process consists of two steps: saving the contact group Excel file as a .CSV file and then importing the .CSV file into your Google Contacts.
Step 1: Entering contacts into an Excel file and saving it as a .CSV

- Open Microsoft Excel. In the first row, label the first three columns as follows:
- First Column: First Name
- Second Column: Last Name
- Third Column: Email Address
- In the rows below those, enter the corresponding information for each contact.
- When you are done entering all the information for each contact, navigate to “File” > “Save As”.
- From the “Save as type:” drop-down menu, select “CSV (Comma delimited) (*.csv).”
- Select a location to save the file.
- Click [Save]. If a window pop-ups asking if you want to keep the workbook in this format, click [Yes].
Note:
You may also include more contact information by adding columns titled "Home Address" and "Home Phone". To view the complete list of column headings you can include, create a "Test" Google Contact and fill in all the desired fields. Export (.CSV) the "Test" Google Contact and open it in Excel. Copy and paste all the relevant column headings into the Excel sheet you wish to import into Google Contacts.
You may also include more contact information by adding columns titled "Home Address" and "Home Phone". To view the complete list of column headings you can include, create a "Test" Google Contact and fill in all the desired fields. Export (.CSV) the "Test" Google Contact and open it in Excel. Copy and paste all the relevant column headings into the Excel sheet you wish to import into Google Contacts.
Step 2: Importing the .CSV file into Google Contacts
The new Google Mail only offers a preview version of your Google Contacts. Google will prompt you to restore your old contacts in order to import them. If you already have the old version of Google Contacts, you can skip to Step 5.
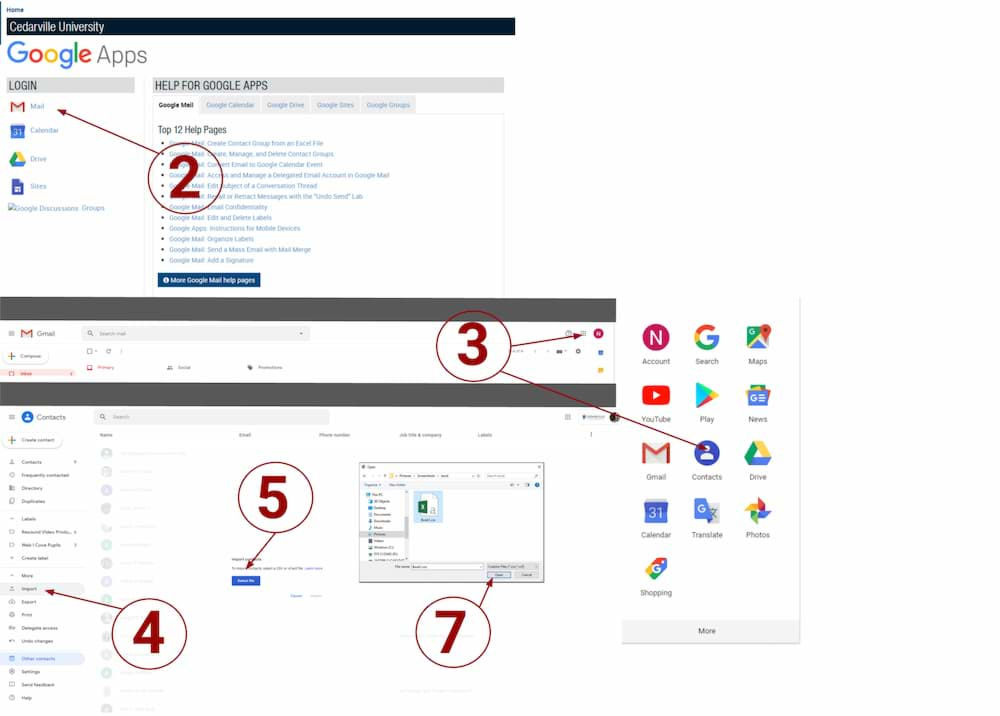
- Navigate to cedarville.edu/google.
- Click the “Mail” link and log in using your CedarNet credentials.
- In the upper-left corner, click the "Mail" drop-down menu > Select "Contacts."
- From left side panel, select "More" > "Import."
- In the resulting dialogue box, click [GO TO OLD CONTACTS].
- Click [More] > Select "Import..."
- Click [Choose File] and double-click the file containing the shared contact group > Click [Import].
- Click the name of the contact group in the sidebar. (The name will be “Imported” along with the date.) You will have a notification that “These contacts have been imported, but not yet merged.”
- Click [More] > Select “Find & merge duplicates.”
- Click [Merge]. The contacts are now merged and imported.
- To rename the group, select the group from the left side panel.
- Click [More] > Select "Rename group".
- In the resulting dialogue box, enter a new name in the provided field, and then click [OK]. The group is renamed and will appear as that name in the contact groups list.
Note:
If the .CSV filed you imported contained contacts already in your Google Contacts, you may have duplicates of those contacts in the base "My Contacts" group. For more information, see the Google Mail: Merge Duplicate Contacts help page.
If the .CSV filed you imported contained contacts already in your Google Contacts, you may have duplicates of those contacts in the base "My Contacts" group. For more information, see the Google Mail: Merge Duplicate Contacts help page.
Posted in Computer Help